Friday, July 30, 2010

Sew little patience......

Patience has never been one of my best virtues. Some people are blessed with it. I tend to be an instant gratification person which probably explains why sewing and I have never been great partners. I always feel as if sewing just has too many steps. Cutting, pressing, pinning, more pressing.... you get the picture. My friend Robin
sews beautifully. You can tell she makes her cuts precise, pins everything correctly, creates straight seams, even sews rick-rack the way it was made - not just sewn down the middle. You can see a quilt that she has done here to get the jest of what I am saying. She recently made me this purse.
Photobucket

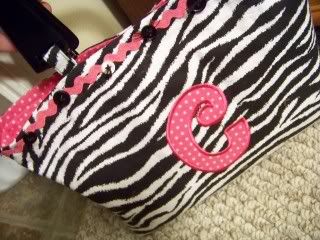
It is sooooo me. I just love it! As I was looking at the construction of it, I could not help but think that she sews like my Mimi (my grandmother). Everything of hers was beautiful too. The inside of her stuff was just as pretty as the outside. She did not care if you never saw it. She knew it was right plus she swore that everything lay better if it was this way.


 My mom is like this too. She tends to be very thorough in how she does things. I don't know what happened to me. I am sure the whole family wonders too. I am always planning, dreaming, got too many ideas and projects to work on..... its a never ending saga. These ladies are inspiring me to try to do better with all of my sewing projects. I do have to say the Embroidery machine and the Cricut are great partners for me. That is some instant gratification right there! For now I will just have to slow down and remember sometimes the extra mile produces better results!

Thursday, July 29, 2010

Personalized baby blocks

Every since I bought my embroidery machine, I have been playing around with fonts I have found. I love this one font in particular named boys. I do not know why they named it boys because it actually works for both genders. All of the capitol letters have a pic of an item that starts with that letter. Just absolutely adorable!!!!!  I immediately thought I would use it to make some baby blocks.

 Then the more I thought about it..... I knew I wanted to put the babies name on it. A name is such a powerful thing. It solidifies who we are, sets forth our identity and it is normally one of the first things a baby learns. I think it is a great way for the child to connect their name with the letters of their name. In addition to the name, I knew I wanted to add taggies, different textures and a sensory effect for the ears. This is what I came up with.
Photobucket
Photobucket

I made this one for Zoey. It has crinkly paper inside the block. The boys and I can not stop touching it. We love the crunchy sound it makes and all the taggies feel neat. Did you notice the zebra in the "Z"? It may be hard to see in the pics but it is there.
Photobucket


Photobucket

Jack will be receiving this one. I really loved all the fabrics I used - a waffle texture, some flannels with cars printed on them and I actually used a square from a onesie with a car embroidery on it. I put a bell inside Jacks block. It sounds great!


Photobucket
 
So what do you think......should I put these in my store? 
Which brings me to another scenario. So many of you keep prodding reminding me to put more of my stuff in the store. It is on my to-do list, I promise but I must tell you a secret. It is so easy to procrastinate on that when you start a project. I tend to love creating toooo much. Then I get lost in it. But I promise I only have 3 projects finish up tomorrow. This coming weekend,,,, my store will be loaded with the items. If I do not do this, someone please prod remind me again ....please!

Wednesday, July 28, 2010

Photo Letters Giveaway!

Photobucket
My friend  Robin is expecting her grandchild Zoey to arrive soon. Fortunately I was able to finish up the letters for Ms. Zoey.  I loved the colors her parents picked out for the nursery - lime green and lavender with a hint of yellow. They also put Tinkerbell in the room so one of the quotes I put on the letters is about fairies and little girls. It seemed appropriate. Other embellishments are buttons, ribbons, photo clips, flowers, a butterfly and simple words like Cherish and Joy. I am sure they will look delightful once they are hanging on the wall with some of Zoey's pictures attached to them, don't you? 

Photobucket

Now I did promise a giveaway and I am just tickled to offer it to you. It is the.....
PHOTO LETTERS!
The winner will receive a set of letters that spell out one of the following:
Love, Hope, Joy or Home. These are 6 in wooden letters with  pre-drilled holes for hanging. Every letter comes with a clip waiting to display your treasured photos. 
If you are chosen , you can let me know your color scheme so I can customize them to match your decor. I will be using a random number generator to choose the lucky person on Sunday, August 1st, 2010 @ 4:00pm.


Just tell me what word you would choose to enter.

I am offering everyone up to four extra chances to enter. (You must leave a separate comment for each one.)


1. Follow our blog Goldilocks Creations. 
( Just leave a comment if you already follow)
2. Grab Goldilocks Creations Button for your blog.
3. Follow Goldilocks Creations on Facebook.
( Just leave a comment if you already follow)
4. Post about the giveaway on your blog or Facebook.


Good luck to all and thanks for visiting us!
:)

Tuesday, July 27, 2010

Chincoteague

We just got back from our little mini vacation to Chincoteague. It was so much fun. We have never been before, well I mean I have read Misty of Chincoteague before. So I guess you could say I had visited before within the pages of the book.  I got some beautiful pictures to share with you. I am glad to be back and look forward to offering my first giveaway which I will tell you all about tomorrow.....Promise!
Photobucket


Saturday, July 24, 2010

Ornament Record Keeper


Photobucket
Every since I posted about our tree trimming ceremony, I have received so many questions as to how we keep track of all those ornaments. Its very easy with this pretty little notebook I made to record all my additions to our ornament collection.
I had to have something to keep up with all of the ornaments as the collection grew.
So many of my ornaments were given to me by my clients in my former life as a hairdresser. My mother always gives me a new hallmark ornament at Christmas. Not all of the ornaments were given to me though. Some of them I acquired as I traveled with my job or when we were on vacation. Many of them have been made by my children and myself which obviously means more than I can say. Several of them are worn out and look a little sad but I must keep them because they were my grandmothers. I remember them in their glory, hanging on her tree mesmerizing me with their beauty.
When we hang these ornaments on the tree, a vivid memory comes back with the ornament. This is the main reason I keep a record. I never want to forget or my children to forget. Not the ornament but the person, the place, or the activity associated with the ornament.
Photobucket

If your collection of ornaments is growing you might want to think of decorating a notebook for yourself too.  So many in your family will appreciate it as time marches on. I guarantee it! ;-)


Friday, July 23, 2010

Penguins Crossing!

Photobucket

Well I told you that I had an ornament for you so let me explain this little fellow to you. Are you familiar with The Penguins of Madagascar? We love them at our house. They completely crack us up. Even my hubby loves them. He usually imitates them and has nicknamed all three boys with one of the penguins names.

I thought it was only fitting to make Penguin ornaments for Christmas this year. This one is really easy to make....
you paint a light bulb!

Seriously , you just spray paint the bulb white. Make an outline of the face and tummy, and dry paint the yellow around the outline. Add the black everywhere else, paint the details on face and spray some clear finish on the bulb. After the finish dries, add some feet cut from yellow foam, wings cut from black foam and a little stocking cap made from a baby sock. Thats it! Simple, right? They are cute and cartoonish looking just like the show.
I think the boys will be happy with the little family of penguins I made to remind us of all the times we have laughed at those penguins antics. 

Wednesday, July 21, 2010

Christmas Giveaways and more!


If you are not familiar with Tip Junkie, I suggest you hop right on over to her blog and become familiar with it. Laurie has great, awesome giveaways going on right now to celebrate her Christmas in July. I discovered Tip Junkie a couple of years ago and have always found it to be a great resource for decor ideas, printables, organizational tips and creative holiday info. She truly tries to support moms with businesses with her mom-preneur shop. You can always find unique items made by moms. If you are looking for a giveaway , you will find lots of those as well since so many women post their giveaways on the Tip Junkie. It truly is like a one stop shop.  So go ahead, check her out and go win some stuff!

Now, I had an adorable ornament that I was going to show you but guess what? My camera batteries died again. I did not have any xtras laying around this time so we will have  to wait on that but I do have this to show you. When you look I am sure you are going to wonder.........
Photobucket
what do these fish have to do with Christmas????
 They are actually ornaments for my boys. I found these and thought they would be a nice representation of how we live on the coast.

Every year I give the boys several ornaments to add to their collection. It is my hope that when they go off into the world on their own, I will be able to hand them their box of ornaments to have a complete tree done. Now my oldest already has 62 ornaments in his box. He is 14  years old. I think we are on target to achieve this goal. Of course my DH pointed out to me that more than likely they will marry a girl who will say "We are not using those!".
I think the man really likes busting my bubbles sometimes. Oh well only time will tell about that but for now my boys love this tradition and so do I. C-ya tomorrow and don't forget about those great giveaways and Christmas ideas over at the Tip Junkie!  :)


Monday, July 19, 2010

Christmas Cookies Galore

Photobucket

I love to bake cookies, my boys love to eat cookies, it is the perfect relationship. The lord knew which boys needed to come to me. *LOL* I make up a lot of cookie trays as gifts as I am sure so many of you do too. Our family has a hard time deciding which cookies make the cookie tray list. As of last year we  I made at least 26 different cookies and candies for the trays that we give to family, friends and coworkers. It was really just way too much work. Of course I had pnuemonia also......... so that could have been a little bit of a factor(maybe just a little). This year I have decided it was too stressful so  each person may choose their top 3 cookies or candies that they think should be on the tray. They taste, they vote, they taste some more and remake their list again. It should be interesting to see what we end up with this year.

My top 3 cookies and candies are Red Velvet Cookies, Pecan Sandies and  Buttered Rum Fudge. The Red Velvet Cookies are by far my most requested christmas cookie. The recipe I use for them is Paula Deens recipe for her Red Velvet Cookie Sandwiches. Obviously I do not make them into sandwiches. I just make them into cookies, after they cool I drizzle them with cream cheese icing and sprinkle them with chopped pecans or walnuts ( whichever I happen to have). They are delicious.
I have been known to make them at times other than christmas just because I love them sooooo much.

My grandmother made Pecan Sandies every christmas. They are basically like mexican wedding cookies or danish cookies. It is a delicate shortbread cookie loaded with chopped pecans and rolled in powdered sugar. I still love licking the powdered sugar off my fingers!  I feel like I am a child again when I eat them.

The Buttered Rum Fudge recipe came from one of my Pillsbury cookbooks I received almost 15 years ago. I love it because of its flavor and the ease of making it. I always get request for this recipe when I serve it or give it as a gift.If you have never tried Buttered Rum Fudge, let me encourage you to give it a try. I am sure you will not be disappointed. I will warn you though, like any fudge it is sweet but that is what the holidays are all about , right?


Friday, July 16, 2010

The Blessed Star Tradition

This Blessed Star is a delightful tradition to introduce to your house during the holidays. You will find that it moves the focus back to where it should be during the season even though we are constantly bombarded with the material aspect of the holiday. Ever year I make at least twenty of these to give away as gifts. They are always very well received. I had to hunt down where and how I was introduced to this. This was such a difficult task due to the overwhelming collection of books I have on Christmas ornaments and traditions. Diligence does pay off though. I discovered it in my Making Memories book "A Season of Giving". They also have another book "A Season of Joy", both are loaded with ideas to stir your creativity.

Photobucket


The book suggest you make a  paper mache star ornament to attach with the poem but I have used stars made from all types of materials- wooden, tin, paper, and wire.  The main thing is to embellish the star with a tag that says "Blessed".  After you decide what star ornament you are making just attach the following poem to it. Voila! You have an instant gift that is sure to be treasured for years to come.

The Blessed Star

Here’s a magical Christmas star
with a tradition old and true
may it bring you warmth and love
from our home to you.

Now everyday ‘til Christmas
find someone in your home
and secretly do a deed of love
so your identity won’t be known.

And when the secret act is done
place the star upon their bed.
They in turn do a secret deed
for another, it is said.

And like the star so long ago
lit the sky for all to see
may this star bring light and joy
to your sweet family.

Author unknown

Here are a couple of links to inspire you to create a special star:

Thursday, July 15, 2010

Make an Ornament!

Christmas would not be normal at our house if we did not make some ornaments. I guess by now you figured out I love ornaments. I am sure when I mentioned how many ornaments we put on the tree that you got the hint. We usually try to make at least two new ornaments to add to the collection every year in addition to the hallmark ornaments we purchase. Paper ornaments are very easy for kids to do. Sometimes just a little addition of some embellishments will take it a step further into something that becomes quite a treasure.

The last two years we made some lovely bird ornaments. The pattern I used is from Family Fun magazine (truly an essential read at our house). It is a simple pattern to trace and cut to be adapted as you see fit. Family Fun made the bird out of stiff felt but I chose to make ours out of card stock paper. I downloaded the pattern from their site and used it to make some tracers out of tagboard.
Photobucket
Then you simply use the tagboard tracer to draw out the birds body and wings. I have found an xacto knife and small embroidery scissors to be my best friend in this project but for obvious reasons they do not partner well with kids. If your children are making these just use scissors that are appropriate to their hands.You will need to to make a tiny slit in the middle of the wings and the body so that they slide into each other to achieve the 3D effect.

 You could certainly stop here and have a  very simple endearing little ornament.
 I decided to take ours another step by adding some beads and glitter to the bird.
We brushed the tips of the wings with glue and sprinkled a tad of irradescent glue on it.  Using a very small hole puncher, we added a hole at the top of the head to attach the hanger.  The beads were attached in the same manner at the bottom of the body.
You could use string to hang them or do I as I have done with an ornament hanger.
Photobucket
 The Christmas Cardinal
Photobucket
The Dove
We have packaged these several ways in the past.
 If you do not assemble , they work well in a card as Family Fun suggest. 
 Most of the time I give it as an assembled ornament.
We just wrap it delicately in tissue paper and place it in a box meant for a coffee mug.  Usually I will create a card with a cardinal stamped on the front and this on the inside:

The symbol of the Cardinal

The cardinal has become a symbol
of the beauty and warmth
of the holiday season.
Known for its spectacular red color,
many call it the Christmas bird.

The cardinals scarlet plumage
represents the blood of
Christ shed for the
redemption of mankind.

As you hang your ornament on
the tree, we hope it serves
as a little reminder of the reason
we celebrate the season.
Photobucket

Unfotunately I can not find my symbol of the dove card but as soon as I do I will post it. I will have to look for my hard copy which is not as easy to locate as an electronic one.
Who knows where it went!

Tuesday, July 13, 2010

The Legend of the Christmas Tree

Photobucket
Oh the christmas tree! Can you think of anything else that kicks the season off more than putting up and decorating the tree. The boys always ask what day  we will be putting ours up. I usually have to put the DAY on the calendar. I wish I could say it starts off like a hallmark moment but well..... not really. I have 873 ornaments that need to go on the tree so that is about 5 tubs of ornaments that must be taken out of storage. The tree is a prelit 7' artificial tree (we all have allergies) which is way too heavy for me to put up by myself. I actually empty all of the ornaments out of the tubs and organize them as to what part of the tree it needs to be hung on. Once I have that chore out of the way then we begin acting out more of a hallmark scenario... kind of , remember I have 3 boys. We always have some bickering over who is doing what to the tree.  The boys love hearing the stories that go with each ornament. Each one usually reminds us of a special person or time in our lives. I keep all information (who and where it came from ) in my ornament journal so that I will not forget as time marches on .

The boys enjoy listening to the inspirational story of the tree which they know so well due to this wonderful book I bought years ago . I always read it the day before the tree decorating ceremony begins at our house . You can find more info about it here.

While  we work on the tree, we enjoy some gingerbread and sugar cookies that are shaped like bread twist and apples. You will understand why they are shaped like apples and bread twist once you read the story. I am always amazed at how the tree can cast such a magical spell on our family. It is the one night that I can count on peace and silence at our house. :)

Monday, July 12, 2010

Christmas Handprint Activity

Photobucket

I love doing handprint art......the cool things you can make your handprints into, the way you document how your childs hands change over time and the fun you have creating a treasure that makes a memory to last for years to come. For those reasons I must start with this simple tradition that we do every christmas. Over the years we have made christmas trees, doves, wreaths, angels, santa faces and reindeer. However this reindeer has to be one of my favorites. I saw this reindeer face on a dinnerplate a couple of years ago and immediately thought what a great little design to add some handprints to. I love how sweet and peaceful the reindeer looks with the eyes shut.

 To get started I drew a template of the reindeer face. After I was satisfied with the shape, I took a white science project board and cut it down to 12" x 12" squares. The boys and I drew the face on the boards with black marker, added the eyes by using a bottlecap from a soda, and put the red nose on with a marker by tracing a quarter. Of course the next part is what the kids love best......painting the palms of their hands to make the antlers. A little tip I have found over the years is to put some paint on a plate and dip a big sponge in the paint to coat their hands with. You can put just the right amount of paint on with this method.I usually do one hand at a time. If you are trying this with a baby or toddler, you may have to ask for some additional help to keep their hands steady to print.

Once you have the handprints down, you can embellish it as you wish. 
I decided to wrap the boards edges with red duct tape to create a frame around the print but you could certainly frame it if you like. We added some ribbon and buttons to make hangers for the reindeer, signed  and dated it to finish it off.

We used this reindeer design as a craft activity for a cookie decorating party I had for the twins friends last year. It turned out to be a great memento to remember the wonderful time we had that day. I recall it took me only an evening to prep 10 boards for the party.

Hopefully this will inspire you to start a tradition of doing a handprint activity with your child. If you need more inspiration you might want to check out Artist helping children. They have lots of handprint designs to choose from.

Have a great day!

Friday, July 9, 2010

Its all about me!

At least it was today. I managed to get a good bit of stuff done on my embroidery machine (remember I am still playing exploring on it). It has been fun but also frustrating at times too. Over all though I got quite a bit done. I feel a tad bit more comfortable with it. After focusing on embroidering I was able to finish up a project meant just for me.  I made a little tote to go with a cooler I had bought that is hot pink with white dots. Luckily I had found some placemats with the same design at the Dollar Tree. It was super easy to convert them into a tote. I added a couple of pockets on the outside/ inside and finished it off with my name in some lime thread.
Photobucket
Photobucket


I love it, matches the cooler perfectly! I just need to make me a lime Keyper to wrap around instead of the pink one I have on it now. That will have to wait till my next ME
day.

Oh and can you believe we are almost to the six month mark for Christmas?????
I plan on celebrating next week with a post everyday about all things Christmas. I have already made my list of gifts to make and projects I need to get done. I will share that with you as well as some of our family traditions, ornaments, and favorite dishes. Have a wonderful weekend!

Thursday, July 8, 2010

A Decor Statement

Photobucket
Boys are all that I know at my house. They are noisy, full of energy, collect rocks, sticks and compete over everything. I made these letters to celebrate what our boys are.

Photobucket
I recently fell in love with making letters to spell out names or words but then decided we could take them a step further by attaching clips to hold pictures and embellishments.
Photobucket
It works really well because you can change the pictures out as your subject grows or as a new season blows in.
Photobucket
I am not sure if the words enhance the pictures or vice versa
but I know together it can tell a great story.
Photobucket
This is what decor should be.....a statement....a story about the people and things you love.
Photobucket

I am linking these letters to these great parties:

Favorite%2BThings%2BFridaybig%2Bbutton.jpg

Wednesday, July 7, 2010

College Bound

This past fall I decided I needed a theme for my school accessories. The number one reason was I had an ongoing issue of leaving my cup, clipboard or notebook somewhere around the school during the course of my travels with our K students.
I can not tell you how nice it was to find my misplaced items in my box after they had been misplaced. Everyone 
knew that anything with the  P on a zebra background was Mrs. Patel's. The second reason........ it was just tooo Cute not to do.  I even  managed to find zebra  pens, pencils, binder clips and umbrella. Yeaa, sometimes its the little things in life!
Photobucket
One of my friends has a daughter thats just as crazy about the zebra print  as I am.   Since J is heading off to college this August, her mom ask me to make a few items to help with the lack of space they have in the dorm rooms. Deb found a comforter set in the zebra print.  I had already made her 2 small square black fabric memo boards with zebra ribbon to coordinate with the comforter. Then I got my embroidery machine. It is so much fun! I can do so many cool things with it. I recently discovered that I can do applique designs too. This is what I came up with, a zebra circle applique with a J in it.
Photobucket
Since the comforter set is a zebra print all over, I thought this bed caddy would stand out more if it was black with just a tad of zebra on it.
Photobucket
It has a total of 6 pockets to hold all those essentials like her phone, ipod, a book, tissues and such. I actually sewed a gripper pad to it to tuck in between the sheets to ensure that it would be snug. One more way I thought we can give J some more storage was to make this chair caddy to keep some school supplies off  the floor  desk so she can work. I did the same design so that we would not be on zebra overload.
Photobucket
Photobucket


If you have ever been  in a college dorm room, you know they must be very creative to find space to store everything. I think this will be very much appreciated by any college bound student. I actually think I need to make one for each of my boys...... hmmm, maybe you will see those in the coming months. 

Check out these wonderful sites that I am linking this project to:


NightOwlCrafting
Photobucket

Tuesday, July 6, 2010

Endangered!

Photobucket

Here is the latest t-shirt I created for the twins. I found these shorts last year, loved them since they had all kinds of cool marine animals on it. The shirt that went with the shorts was kind of lame though. I had been wanting to do a reverse applique shirt for them and thought this was as good as any time to try it. After I did the reverse applique, I did some freezer paper stenciling (I know, you would have never guessed that! *LOL) on the front and the back.
Photobucket


We managed to put the definition of the Sea turtle on the back! Very COOL, don't ya think? I love definitions, have them on some of our home decor so I thought it was time to add it to the clothing aspect of our lives.
I will say this was time consuming though. I used the cricut to cut out all the letters. That definately saved some time but still positioning each letter and ironing it down before painting it was a slow process. Of course that could be because I also have lots of helpers too............

We also started studying the states this week. We are trying to learn about one state per week. If you have any cool ideas or thoughts that will add to our studies, please let me know. I am very open to suggestions.
 Have a great day!
I am linking my tshirt design up to the following:


Photobucket